M4 Su Doku
How to solve the largest Su Doku puzzle in the world
The world's largest Su Doku puzzle was constructed on a hillside near Chipping Sodbury, very close to the Bath exit of the M4 motorway. It is visible to motorists traveling Eastbound towards London. It measures 275ft square and Sky One offered £5,000 to the first person to solve this "particularly fiendish" grid. It was later realised that there was more than one solution to this particular puzzle.
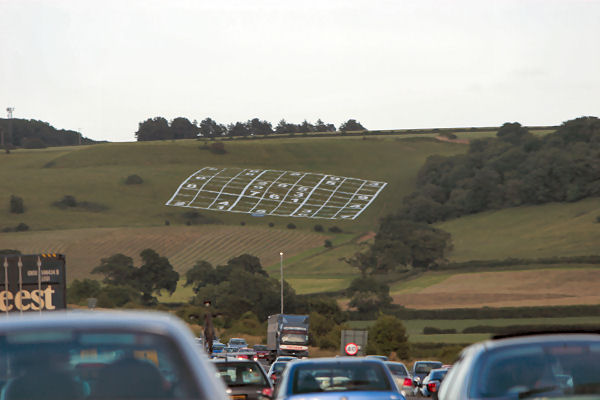
This is how I solved it. The nearly-complete middle block makes it look temptingly easy!

Because each row, column and block can only contain one of each value (1-9), we can jot down candidate values for each cell. For example, the second cell on the first row could be 1, 4 or 7 because none of these values already appear in that row, column or block.

Having jotted down the list of candidates for each cell, we can fill in two of the values immediately. These values are removed from the lists of candidates on the same row, column and block because they cannot appear twice within the same row, column or block.
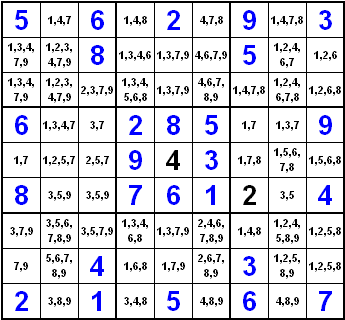
Some numbers only appear in one candidate list per block, so we can fill those in simply because those values cannot appear anywhere else in those blocks..

If we examine the 4th block, we can see that row 5 must contain a 1 in the first or second cell (a 1 cannot be placed anywhere else in the 4th block). This allows us to eliminate all 1's as candidates from the rest of row 5.

If we concentrate our attack on blocks 4 and 6 now, we can see that there are five cells that only contain two candidates. Let's see what happens if we try placing a 7 in one of the possible locations in block 4. (If we reach a dead end, we can backtrack and try the other possible value of 1).

This leaves us with a few single-candidate cells, so they too can be filled in.

This yields another single-candidate cell in the 7th block, which can be filled in.

Another single-candidate cell appears in the 7th block, so we can also fill that in.

Some rows have candidates that only appear in one cell, so they can be completed.

The first block now contains a single-candidate cell, which can be filled in.

There are no more single-candidate cells, so we look for rows, columns or blocks that contain candidates that can only appear in one cell. The 4th block now shows the only possible placement of the number 2, while columns 3 and 8 show the only possible placements of the numbers 7 and 3 respectively.

These steps have resulted in a single-candidate cell being revealed in the first block. This can be filled in.

Another single-candidate cell is revealed and can be filled in.

Notice that the previous step has revealed another single-candidate cell in the 4th block. Another way of deducing this would have been to eliminate all 5's in the 2nd column, as we know that the 2nd column must contain a 5 (and a 6) in the 7th block. The 4th block can now be completed.

Things get a bit trickier now. Consider the highlighted cells. These are the only pairs of cells in each of their columns that contain a 5. This means that all other cells in rows 7 and 8 cannot contain a 5. (This is called the X-Wing method).

Having removed all 5's as candidates from column 8 in block 9, there is now only one cell in column 8 that contains a 5 in its candidate list. This allows us to fill in the 5, as well as the 6 to its right.

Things get even more tricky now, as we have to plan a few moves ahead. Let's consider the effect of picking a value for the highlighted cell.

If we set the highlighted cell to be 4, then the first cell in this block must be 1 and the second cell can only be 9.

We can now tell that this wasn't the right move to make, as it makes the 7th row invalid - the 5th cell on this row must be a 1 or a 9, but both of these values already appear on this row. So we therefore deduce that the correct value to enter into the green square must be 9.

We now have a single-candidate cell on the first row, which can be filled in.

Nothing obvious stands out. Let's try completing the top row, as it is only missing a 1 and a 4 and so there are only two ways of completing this row (we can always backtrack if we pick the wrong one).

This has revealed a few more single-candidate cells, so let's fill those in as usual.

Once again, a few more single-candidate cells are revealed. We haven't reached a dead-end yet, so it's looking quite promising.

Looks like we're cooking on gas now. Let's keep finding these single-candidate cells until we can't find any more.

Another single-candidate cell can be filled in.

And another...

And some more...

And more...

There is only one place that a 3 can fit into the the second block.

When there are only a few cells left to complete the puzzle, it's quite easy to do some exploratory trial and error in your head. Let's stick a 5 and 6 into the 7th block and see where it takes us.

We've found a couple of single-candidate cells again, so fill those in as usual.

A few more single-candidate cells appear. Fill them in!

It looks like we're nearly done!

Finally, the puzzle is complete. A quick check to make sure every row, column and block contains the digits 1-9 confirms that the puzzle has been solved correctly.

Some Su Doku puzzles are harder than this; some are much easier. Bear in mind that this one was not very well designed, as it has more than one correct solution!
Search this site
Copyright Paul Mutton 2001-2013
http://www.jibble.org/
Feedback welcomed
![]()